项目总览
跟着教程开始做第一个React项目,教程见[react小书]
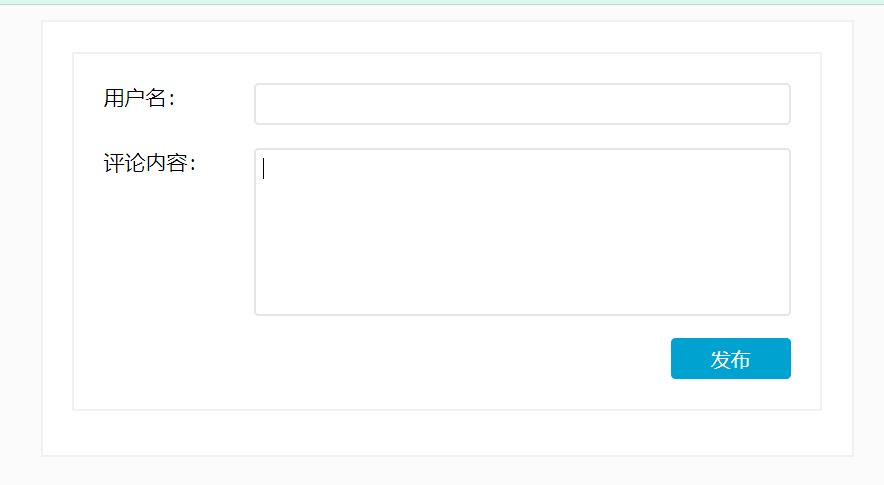
目标是实现如下图所示的一个评论系统

组件划分
在React.js中所有的功能都是组件,因此我们要实现一个项目,首先要对项目进行组件的划分,任何可能复用到其它地方的部分,都可以抽离出来作为一个组件,我们对项目进行如下的组件划分
CommentApp组件表示整个评论的应用
CommentInput负责处理用户输入的区域
而Comment则负责每一条评论,通过CommetList组织
项目的组件树如图所示,我们按照组件树自上而下的原则来依次实现组件
组件框架
首先我们用creat-react-app来创建一个项目
1
| creat-react-app comment-app
|
在src的文件夹下创建四个组件的类文件
1
2
3
4
5
| src/
CommentApp.js
CommentInput.js
CommentList.js
Comment.js
|
然后我们先自上而下地来实现前三个组件
1
2
3
4
5
6
7
8
9
10
11
12
13
14
15
16
| import React, { Component } from 'react'
import CommentInput from './CommentInput'
import CommentList from './CommentList'
class CommentApp extends Component {
render() {
return (
<div>
<CommentInput />
<CommentList />
</div>
)
}
}
export default CommentApp
|
1
2
3
4
5
6
7
8
9
10
11
| import React, { Component } from 'react'
class CommentInput extends Component {
render() {
return (
<div>CommentInput</div>
)
}
}
export default CommentInput
|
1
2
3
4
5
6
7
8
9
10
11
| import React, { Component } from 'react'
class CommentList extends Component {
render() {
return (
<div>CommentList</div>
)
}
}
export default CommentList
|
在React中每个组件都必须从组件父类 Component 继承,并实现对应的render方法,返回组件的html结构,而这里并不像js中实现的返回html是个字符串,而是看起来就是html代码直接嵌入到js中,这种在Javascript中直接用标签写代码的语法叫JSX,JSX语法能够支持在js代码中编写类似html的语法,使得实现方便很多,在编译的过程中JSX结构会转化成Javascript的对象结构
需要注意的是,返回的必须是一个整体,也就是说如果你有两个div,得用一个div打包,然后作为返回值
1
2
3
4
| <div>
<CommentInput />
<CommentList />
</div>
|
JSX对象到页面的过程如图所示
所以我们现在要做的事就是用ReactDOM将组件渲染到页面上,如下修改index.js
1
2
3
4
5
6
7
8
9
| import React from 'react'
import ReactDOM from 'react-dom'
import CommentApp from './CommentApp'
import './index.css'
ReactDOM.render(
<CommentApp />,
document.getElementById('root')
)
|
我们就可以看到组件的简单架构了
然后加上一些简单的样式
1
2
3
4
5
6
7
8
9
10
| class CommentApp extends Component {
render() {
return (
<div className='wrapper'>
<CommentInput />
<CommentList />
</div>
)
}
}
|
1
2
3
4
5
6
7
8
| .wrapper {
width: 500px;
margin: 10px auto;
font-size: 14px;
background-color: #fff;
border: 1px solid #f1f1f1;
padding: 20px;
}
|
评论输入组件
我们先对组件CommentInput进行完善
1
2
3
4
5
6
7
8
9
10
11
12
13
14
15
16
17
18
19
20
21
| return (
<div className='comment-input'>
<div className='comment-field'>
<span className='comment-field-name'>用户名:</span>
<div className='comment-field-input'>
<input />
</div>
</div>
<div className='comment-field'>
<span className='comment-field-name'>评论内容:</span>
<div className='comment-field-input'>
<textarea />
</div>
</div>
<div className='comment-field-button'>
<button>
发布
</button>
</div>
</div>
)
|
1
2
3
4
5
6
7
8
9
10
11
12
13
14
15
16
17
18
19
20
21
22
23
24
25
26
27
28
29
30
31
32
33
34
35
36
37
38
39
40
41
42
43
44
45
46
47
48
49
50
51
52
53
54
55
56
57
58
59
60
| .comment-input {
background-color: #fff;
border: 1px solid #f1f1f1;
padding: 20px;
margin-bottom: 10px;
}
.comment-field {
margin-bottom: 15px;
display: flex;
}
.comment-field .comment-field-name {
display: flex;
flex-basis: 100px;
font-size: 14px;
}
.comment-field .comment-field-input {
display: flex;
flex: 1;
}
.comment-field-input input,
.comment-field-input textarea {
border: 1px solid #e6e6e6;
border-radius: 3px;
padding: 5px;
outline: none;
font-size: 14px;
resize: none;
flex: 1;
}
.comment-field-input textarea {
height: 100px;
}
.comment-field-button {
display: flex;
justify-content: flex-end;
}
.comment-field-button button {
padding: 5px 10px;
width: 80px;
border: none;
border-radius: 3px;
background-color: #00a3cf;
color: #fff;
outline: none;
cursor: pointer;
}
.comment-field-button button:active {
background: #13c1f1;
}
|
看起来已经基本有个样子了,接下来我们要做的事情是把输入的文本记录到状态里面,方便之后在评论列表中显示
记录状态
在React.js中每个组件可以拥有自己的状态,通过state来记录
我们在class中加入构造函数
1
2
3
4
5
6
7
| constructor () {
super()
this.state = {
username: '',
content: ''
}
}
|
然后修改input标签
1
| <input value={this.state.username} />
|
使得其值为username,textarea如法炮制,这时候输入区域和状态就绑定了,同时我们发现,我们没法在框内输入东西了,因为在react中所有的状态都是由state控制的,永远以被设置的值为准
如果希望用输入的值来更新state,则必须使用setState来更新组件的状态,那么要实现这个功能,做法是监听onChange,获取内容,用setState来更新state
先写一个改变状态的方法
1
2
3
4
5
| handleUsernameChange (event) {
this.setState({
username: event.target.value
})
}
|
然后在input中加入监听
1
2
3
| <input
value={this.state.username}
onChange={this.handleUsernameChange.bind(this)} />
|
content的实现方法相同
这里用bind是因为,React中实例方法的this并不指向实例本身,因为React.js调用方法并非通过对象方法的方式调用而是直接通过函数调用,所以事件监听函数内不能通过this来获取实例,需要手动将实例方法bind到当前实例
信息传递
现在我们在CommentInput中记录了输入的状态,我们希望把信息传递到CommentList中渲染,这时候我们就要通过父组件来将两个组件联系起来,这个功能需要父组件向子组件传入一个回调函数,当用户点击发布按钮时,将state传入函数
这在React.js中是用props来实现的,每个组件都可以接受一个 props 参数,它是一个对象,包含了所有对这个组件的配置
我们在发布按钮上添加点击事件,加上对应的事件函数
1
2
3
| <button onClick={this.handleSubmit.bind(this)}>
发布
</button>
|
1
2
3
4
5
6
7
| handleSubmit () {
if (this.props.onSubmit) {
const { username, content } = this.state
this.props.onSubmit({username, content})
}
this.setState({ content: '' })
}
|
这里我们只将content清除,保留state中的用户名,符合正常用户的使用习惯
然后我们在CommentApp上做一个测试
1
2
3
4
5
6
7
8
9
10
11
12
13
14
| class CommentApp extends Component {
handleSubmitComment (comment) {
console.log(comment)
}
render() {
return (
<div className='wrapper'>
<CommentInput
onSubmit={this.handleSubmitComment.bind(this)} />
<CommentList />
</div>
)
}
}
|
父组件成功获取了子组件的状态信息
评论与列表组件
接着我们来撰写评论和列表组件
1
2
3
4
5
6
7
8
9
10
11
12
13
14
15
16
| import React, { Component } from 'react'
class Comment extends Component {
render () {
return (
<div className='comment'>
<div className='comment-user'>
<span>{this.props.comment.username} </span>:
</div>
<p>{this.props.comment.content}</p>
</div>
)
}
}
export default Comment
|
1
2
3
4
5
6
7
8
9
10
11
12
13
14
15
16
17
18
19
20
21
| .comment {
display: flex;
border-bottom: 1px solid #f1f1f1;
margin-bottom: 10px;
padding-bottom: 10px;
min-height: 50px;
}
.comment .comment-user {
flex-shrink: 0;
}
.comment span {
color: #00a3cf;
font-style: italic;
}
.comment p {
margin: 0;
text-indent: 2em;
}
|
这里我们在列表中预设了comment数组方便测试效果
显示正常,接下来我们将数组替换成props传入的参数
1
2
3
4
5
6
7
8
9
10
11
12
13
14
| class CommentList extends Component {
static defaultProps = {
comments: []
}
render() {
return (
<div>
{this.props.comments.map((comment, i) =>
<Comment comment={comment} key={i} />
)}
</div>
)
}
}
|
这里注意需要设置一个defaultProps,否则在没有comment传入的时候会报错
最后我们将这个部分和CommentApp联动
1
2
3
4
5
6
7
8
9
10
11
12
13
14
15
16
17
18
19
20
21
22
23
24
25
26
27
28
29
30
| import React, { Component } from 'react'
import CommentInput from './CommentInput'
import CommentList from './CommentList'
class CommentApp extends Component {
constructor () {
super()
this.state = {
comments: []
}
}
handleSubmitComment (comment) {
this.state.comments.push(comment)
this.setState({
comments: this.state.comments
})
}
render() {
return (
<div className='wrapper'>
<CommentInput onSubmit={this.handleSubmitComment.bind(this)} />
<CommentList comments={this.state.comments}/>
</div>
)
}
}
export default CommentApp
|
就彻底完成了这个项目